Creamy Greek Yogurt No-Bake Cheesecake That Never Fails
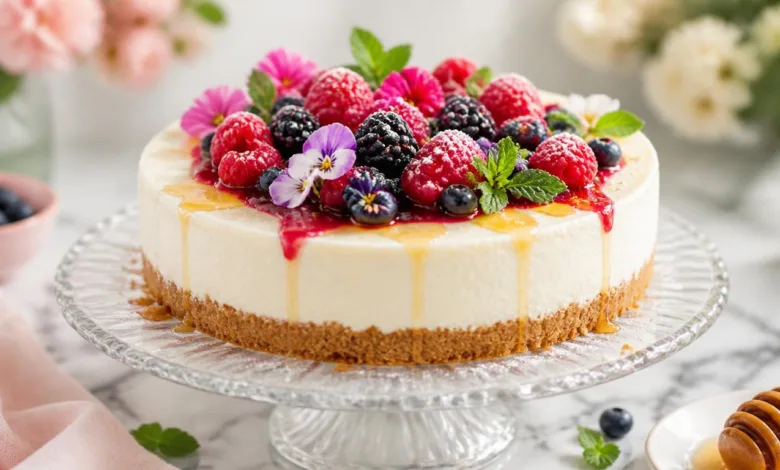
You know that feeling when a cheesecake craving hits, but the thought of dealing with a water bath, cracked tops, and constant oven checks sends you running for the hills? I’ve experienced this frustration far too often, which is exactly why I keep this delightful No-Bake Greek Yogurt Cheesecake recipe on hand. It delivers that classic creamy and tangy cheesecake experience without turning your kitchen into a high-pressure zone.
If you’re a beginner, pressed for time, or simply prefer to sidestep the unpredictable nature of baked cheesecakes, this is the perfect recipe for you. I created it using thick Greek yogurt combined with a touch of lemon, resulting in a filling that’s bright and rich rather than overly heavy. The crust is made with coconut oil, which sets beautifully in the fridge, allowing for clean, beautiful slices every time.
For those who have struggled with lumpy fillings, crumbly crusts, or cheesecakes that refuse to set properly, this guide will help you navigate the process with ease. You will discover how to achieve a smooth filling, a solid crust, and a cheesecake that slices effortlessly. What makes this no-bake cheesecake stand out is the reliance on fats and chilling time rather than eggs and baking.
After trying various combinations with butter, oil, and different types of yogurt, I found that coconut oil creates a firm crust without becoming greasy when sliced. For the filling, starting with properly softened cream cheese and using a thick, full-fat Greek yogurt is key. My go-to is Fage 5%, which provides both the body and tang needed without requiring gelatin for setting.
This no-bake cheesecake is perfect for busy weeks or make-ahead desserts for gatherings. You can whip it up the night before, top it just before serving, and completely avoid babysitting an oven. The ingredient list is simple, but understanding the role of each component ensures you sidestep common no-bake cheesecake pitfalls.
Essential Equipment
To make this cheesecake easier, you’ll need a few tools:
- An 8-inch or 9-inch springform pan (or a deep pie dish)
- A hand mixer
- A rubber spatula
Preparing Your Ingredients
-
Cream Cheese: Make sure your cream cheese is at about 70°F to avoid lumps. Cold cream cheese tends to break into small pebbles during mixing, making it difficult to achieve a smooth texture. To bring it to the right temperature, cut it into cubes and let it sit out for 30 to 45 minutes if your kitchen is cool.
-
Greek Yogurt: This ingredient plays a crucial role in both texture and tanginess. Using a thick yogurt like Fage 5% adds creaminess without making the filling too runny. If you have regular Greek yogurt on hand, consider straining it using a coffee filter for about 30 minutes to thicken it.
-
Coconut Oil: The secret to a sturdy crust is the use of coconut oil, which hardens when chilled. While butter also works, coconut oil allows the crust to hold together well. If you’re not a fan of coconut flavor, use refined coconut oil to keep it neutral.
-
Honey: This natural sweetener adds a subtle sweetness and complements the tang of the yogurt. If you choose to replace honey with granulated sugar, be sure to adjust the vanilla or lemon slightly for balance.
Tips for a Perfect No-Bake Cheesecake
-
Read the Recipe: Before diving in, read through the entire process to avoid any surprises with chilling or softening times.
-
Ingredient Texture: When swapping out ingredients, prioritize texture first, followed by flavor, to maintain the integrity of the cheesecake.
-
Proper Chilling: Allow the cheesecake to chill completely before slicing for the cleanest cuts. A minimum of 6 hours is recommended, but overnight is even better for perfectly defined edges.
-
Mixing Techniques: When mixing, start slowly to combine ingredients before increasing the speed. Overmixing can lead to a runny texture.
When serving this cheesecake, it’s best enjoyed cold. The chilled crust holds together perfectly, and the filling avoids any slumping on the plate. For a classic diner-style presentation, consider topping it with whipped cream and maraschino cherries, drizzled with a bit of honey for that sweet-salty-tangy finish.
Serving Suggestions and Pairings

This cheesecake pairs wonderfully with fresh fruit. A vibrant fruit bowl filled with strawberries, pineapple, and grapes can enhance the experience by cutting the richness of the cheesecake and providing a lighter option for guests.
For beverage pairings, hot or iced coffee, or a nice black tea complements the flavors beautifully, balancing the sweetness with a slight bitterness. If you’re looking for a refreshing summer option, sparkling water with a splash of lemon or unsweetened iced tea also works well.
This versatile dessert can be enjoyed year-round. In spring or summer, feel free to swap cherries for seasonal berries, while in winter, keep the cherries and add a pinch of cinnamon to the crust for warmth.
Storage and Meal Prep
The No-Bake Greek Yogurt Cheesecake can easily be prepared ahead of time. It actually gets better after an overnight rest, as the flavors meld and the texture improves.
Refrigerator: Store the cheesecake tightly covered in the fridge for up to 4 days. Keep any toppings separate to maintain their freshness.
Freezer: If you want to extend its life, freeze the cheesecake (without whipped cream) for up to 2 months. Slice first, wrap individual pieces in plastic wrap, and place them in a freezer bag for easy access.
Thawing: Thaw slices in the fridge for 6 to 8 hours or let them sit at room temperature for 20 to 30 minutes for a quicker option. The texture may soften slightly when thawed this way.
Common Mistakes to Avoid
-
Lumpy Filling: If your cream cheese was too cold, you’ll end up with lumps. Let the mixture sit at room temperature for 10 minutes, then re-beat. Alternatively, press it through a fine mesh sieve to remove the lumps.
-
Crumbly Crust: This usually occurs when the crust wasn’t packed tightly enough or the crumb-to-fat ratio is off. Ensure you press it firmly into the pan and consider adding a little extra coconut oil if it crumbles.
-
Soft Filling: A common reason for a soft cheesecake is using a thinner yogurt or not chilling long enough. If it’s already made and too soft, you can freeze it briefly to help firm it up.
-
Bland Flavor: Achieving a well-rounded flavor in a cheesecake requires balance. If the filling tastes flat or overly tangy, add a pinch more salt to enhance flavor or a touch more honey to soften sharpness.
Variations and Substitutions
If you want to change things up a bit, here are some variations to consider:
-
Dairy-Free Version: Substitute dairy-free cream cheese and unsweetened coconut yogurt. Replace honey with maple syrup for a fully vegan alternative. Be sure to chill overnight, as dairy-free blends can often set softer.
-
Sugar-Free Option: Omit the sugar in the crust and opt for a sugar-free honey alternative in the filling. Keep the lemon and salt to ensure the sweetness feels complete.
-
Nut-Free Variations: This recipe is naturally nut-free, but if you’re using store-bought whipped toppings, check for any potential cross-contamination warnings.
-
Creative Flavor Twist: If you’re feeling adventurous, add 1 teaspoon of lemon zest to the filling for an extra citrus kick. Top it off with fresh blueberries or strawberries instead of maraschino cherries for a fun twist.
Conclusion
In summary, this No-Bake Greek Yogurt Cheesecake offers a wonderful dessert experience that is both simple to create and incredibly rewarding. It allows you to indulge your cheesecake cravings without the hassle of traditional baking methods. Whether you’re making it for a potluck, a family gathering, or simply treating yourself, this flexible recipe is sure to impress. Plus, its storage capabilities make it a practical option for meal prep, allowing you to enjoy sweet moments throughout the week.
Remember, cooking is about enjoying the process, so have fun experimenting with this versatile recipe and make it your own.