Creamy High Protein Chocolate Ice Cream Without an Ice Cream Maker
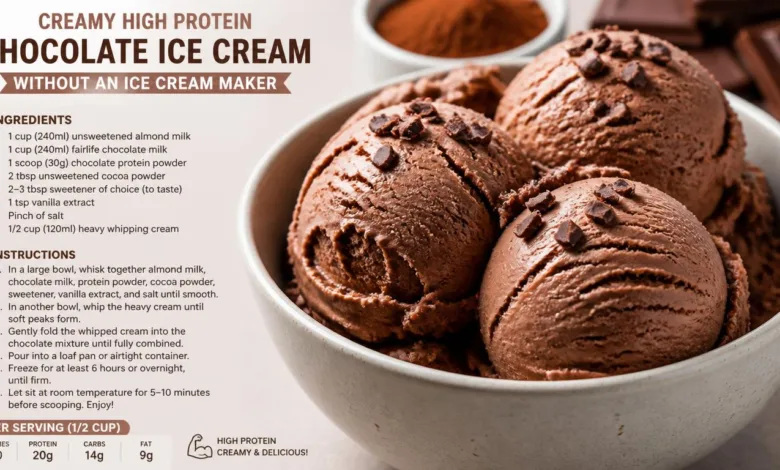
Indulging in chocolate ice cream can be one of life’s simplest pleasures. However, many of us shy away from the traditional preparation methods that require an ice cream maker, time-consuming steps, and extensive ingredients. If you’re like me, craving a quick, cold treat on a busy weeknight without the hassle, I have just the solution for you: Chocolate Cottage Cheese Ice Cream.
This delightful recipe is not only straightforward but also utilizes ingredients that are often staples in your pantry. You can whip up this high-protein dessert with just a blender, making it an ideal choice for beginner cooks or anyone who appreciates a satisfying yet healthy sweet treat.
The beauty of Chocolate Cottage Cheese Ice Cream lies in its simplicity. You don’t need any fancy ice cream making gadgets or complicated techniques. Just throw the ingredients into the blender, freeze them, and you’ve got yourself a creamy dessert that feels indulgent while still being nutritious.
Benefits of Choosing Cottage Cheese
Cottage cheese is the star of this recipe, acting as the base that brings a delightful creaminess to the ice cream. When blended properly, it transforms from a chunky texture into a smooth, velvety mixture. This high-protein ingredient allows you to enjoy your dessert without the guilt, making it suitable for various dietary preferences.
Cottage cheese is rich in protein, calcium, and other essential nutrients, helping you feel full while satisfying those sweet cravings. Many people have attempted making “healthy ice cream” but have been left disappointed by the icy texture that often results. Luckily, this ice cream manages to avoid that pitfall by focusing on blending techniques and ingredient choices.
The Essential Ingredients
To create this Chocolate Cottage Cheese Ice Cream, you will only need five main ingredients. Each one plays a vital role in achieving the perfect flavor and texture. Here’s what you’ll need:
-
Cottage Cheese: This serves as the foundation of the recipe. Opt for a brand that you enjoy eating on its own. I have found that small-curd cottage cheese tends to blend smoother, but any curd size is fine as long as you blend long enough to achieve that silky consistency.
-
Cocoa Powder: This is your key to achieving a rich chocolate flavor. You can choose between Dutch-process cocoa, which offers a more intense and smooth flavor, or natural cocoa, which has a classic chocolate taste with a sharper profile.
-
Sweetener: Here, you have some flexibility. Honey and maple syrup work well to not only sweeten the mixture but also keep the texture scoopable when frozen. If you prefer a low-calorie option, be sure to taste your base before freezing, as some sweeteners may taste sweeter after they’ve chilled.
-
Vanilla Extract: This is the ingredient that elevates your ice cream’s flavor, rounding out the cocoa and making the treat feel more decadent.
-
Optional Add-ins: Depending on your preference, you might consider a pinch of salt to enhance the chocolate flavor or even a teaspoon of espresso powder to bring out a deeper, mocha-like taste.
The Blending Process
To begin making your Chocolate Cottage Cheese Ice Cream, start by measuring one cup of cottage cheese and placing it in your blender. Add two tablespoons of cocoa powder, your chosen sweetener (two tablespoons), and one teaspoon of vanilla extract.

Start blending on a low setting for about 10 seconds to combine the initial ingredients. After that, switch your blender to high for 45 to 90 seconds. You’re looking for a perfectly smooth texture, so don’t be afraid to stop, scrape down the sides, and blend again for an additional 20 to 30 seconds. It’s essential to taste the mixture at this point to determine if you want to adjust the sweetness.
Once everything is blended into a creamy consistency, pour the mixture into a shallow, freezer-safe container. A loaf pan or small container with a lid typically works best. Cover the container and set it in the freezer for 2 to 3 hours. It should be firm enough that you can press a spoon into it without too much resistance. If you prefer a creamier texture, remember to stir the mixture once around the 60-minute mark to break up any ice crystals that might be forming.
Serving Suggestions
Now that your delicious Chocolate Cottage Cheese Ice Cream is ready, how should you serve it? There are numerous ways to enjoy this delightful treat, and you can easily customize it to suit different occasions or cravings.
For a cozy weeknight dessert, serve it in a bowl and drizzle with warm chocolate or nut butter. The warmth melts the surface slightly, enhancing the creamy texture.
If you’re looking for a delightful way to incorporate fresh fruits, consider topping individual servings with seasonal fruits. Strawberries in the spring, cherries in the summer, or segments of orange in the winter can add a refreshing contrast to the chocolate. Another fun idea is to use crushed peppermint candies or a spoonful of cranberry sauce as a holiday-inspired topping.
For a unique flavor experience, serve your ice cream alongside drinks like cold brew coffee, a cup of hot mint tea, or even a glass of milk. If you’re entertaining, place your Chocolate Cottage Cheese Ice Cream on a dessert board with brownies or chocolate chip cookies. This combination will provide a delightful mix of textures, from creamy to crunchy.
Storing and Meal Prepping
This ice cream can be made in advance, making it a convenient option for meal prep. Store your Chocolate Cottage Cheese Ice Cream in an airtight container in the freezer for up to two weeks for optimal flavor. After this period, while it remains safe to eat, it may become icier, and the chocolate aroma could diminish.
In case you freeze it for longer than three hours, plan to allow it to soften at room temperature for about 10 to 15 minutes before scooping. If you find that it has become very firm, you can microwave it for about 10 seconds; this should help soften it without melting the edges.
For the best results, consider freezing in single-serving containers, allowing you to take out just what you need without having to scoop from a larger container. A clever tip is to line your container with parchment paper; this way, you can lift out the ice cream block and slice it into convenient chunks, making it easier to blend back into a “soft serve” texture if you wish.
Avoiding Common Mistakes
When making Chocolate Cottage Cheese Ice Cream, there are a few common pitfalls to watch out for.
-
Under-blending: If your mixture tastes gritty or grainy, that’s a sign that the cottage cheese hasn’t been blended long enough. Blend for an additional 30 to 60 seconds until it feels silky smooth.
-
Over-freezing: If you accidentally freeze your ice cream overnight, it can become rock hard due to the low-fat nature of the cottage cheese. Remember to allow it to sit at room temperature for 10 to 15 minutes before scooping.
-
Weak Chocolate Flavor: If your chocolate flavor seems lacking, it could be due to the type of cocoa used. Mixing Dutch-process cocoa into your base can lead to a deeper flavor, while making sure the cocoa is thoroughly hydrated assists in distribution.
-
Bitterness in Flavor: If you experience bitterness, your cocoa may not have enough sweetness or might be too strong for the amount of sweetener used. Adjust these levels by adding more sweetener and re-blending before serving.
-
Too Sweet After Freezing: Different sweeteners may impact the flavor post-freezing. If this is a consistent issue, try cutting back on the sweetener slightly next time.
Variations and Substitutions
There are several ways to adapt this recipe based on your personal preferences or dietary needs:
-
Sugar-Free Version: For those seeking a lower-calorie option, using a low-calorie sweetener that measures like sugar can help you achieve a similar sweetness without the added sugar. Start with one tablespoon and adjust as needed. A pinch of salt may help to balance sharp flavors.
-
Dark Chocolate Variation: For a more intense chocolate experience, consider adding an extra tablespoon of cocoa powder along with one or two teaspoons of additional sweetener.
-
Mocha Chocolate Ice Cream: Mixing in a teaspoon of instant espresso powder enhances the chocolate flavor profile without giving it a coffee taste.
-
Nut-Free Option: If you’re looking for a little crunch without using nuts, toasted oat crumbles or crushed rice cereal can give you that texture while remaining allergen-friendly.
-
Dairy-Free Adaptation: While cottage cheese doesn’t have a straightforward dairy-free alternative, blending silken tofu with cocoa, sweetener, and vanilla can create a similar mousse-like dessert.
Final Thoughts
The secret behind creating perfect Chocolate Cottage Cheese Ice Cream lies in mastering the blending process, freezing it at just the right moment, and adjusting the sweetness to suit your palate. This recipe simplifies the ice cream-making experience without compromising on flavor or texture, allowing you to indulge in a rich chocolate dessert anytime you want.
Whether you are looking for a quick weeknight treat, meal prep snacks, or something special for gatherings, this ice cream meets all those needs. Prepare a batch, place it in your freezer, and savor those creamy, chocolatey spoonfuls that taste indulgent yet are smartly made. Don’t forget to share your creations and let others know what sweetener you preferred for your version of this easy, high-protein ice cream dessert.