Frozen Greek Yogurt Protein Bites for a Healthy Sweet Treat
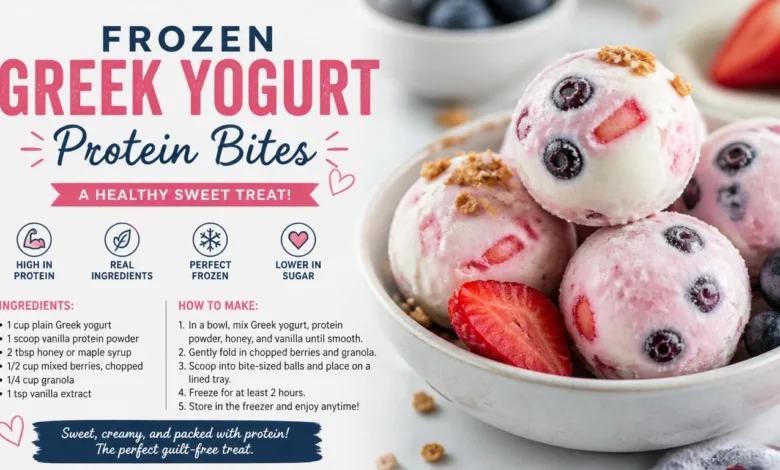
When 3 p.m. rolls around, and you find yourself craving something sweet and icy, the search for a snack can be tough. I understand that feeling all too well, which is why I regularly whip up my Delicious Frozen Greek Yogurt Bites. These little gems tackle your snack cravings without the fuss of a baking project, and they are so straightforward that even half-awake, you can get them made.
Whether you are a kitchen novice seeking an easy win, a busy parent looking for a quick treat, or someone who loves meal prepping, this recipe is about to become your go-to. No need for fancy gadgets or expert knife skills — if your fruit seems a bit uneven, that’s perfectly fine; once frozen, it won’t make a difference.
Why This Recipe Stands Out
What sets my recipe apart is its practicality. The yogurt base maintains a creamy texture, the fruit stays put without excessive leakage, and you’ll end up with perfectly sized bites that won’t stick to the tray. By following this easy guide, you’ll master how to mix, portion, freeze, and store these treats, keeping them on hand as a delightful snack throughout the week.
One of the keys to achieving a great texture is using Greek yogurt. Its lower water content compared to regular yogurt means it freezes in a creamier form, avoiding that undesirable icy texture. After numerous experiments, I’ve pinpointed the top reason behind mishaps in texture: excess moisture. This recipe avoids that pitfall right from the start.
Control Your Sweetness
Another advantage is the control you have over the sweetness level. Using honey contributes a softer freeze with a touch of floral note, while maple syrup is a fantastic vegan alternative that brings a warm flavor, harmonizing beautifully with fruits like berries and mango. This makes it an ideal treat for anyone looking for a sweet moment without the effort of traditional desserts. Unlike some versions that can become hard as a rock when frozen, these bites are portioned just right for quick thawing and optimal enjoyment.
Ingredient Overview
These Frozen Greek Yogurt Bites are crafted mainly from yogurt and fruit, resulting in simple yet satisfying treats. They are perfect for quick snacking or dessert offerings, making them a staple for meal prep and young ones’ lunchboxes. Let’s break down what you’ll need.
Key Ingredients
- Greek Yogurt: Provides thickness, creamy texture, and protein. If you prefer vegan options, choose coconut or almond yogurt labeled as “Greek-style.”
- Sweetener: Honey or maple syrup, which lowers the freezing point, ensuring the bites remain soft rather than solid.
- Fruits: Small pieces of strawberries, blueberries, and mango add sweetness, flavors, and vibrant colors.
- Mix-ins: Mini chocolate chips or chopped nuts can enhance texture and give the bites that extra treat feel.
Step-by-Step Instructions
Preparing Your Ingredients
-
Line Your Tray: Start by lining a baking sheet or a large plate with parchment paper. This nonstick surface will prevent the bites from freezing to the tray, making cleanup a breeze.
-
Wash and Dry Fruit: Take your chosen fruits, wash them thoroughly, and dry them with a clean towel. Moisture on fruit can lead to ice crystals forming in the yogurt.
-
Cut the Fruit: Chop strawberries and mango into small pieces, approximately a 1/4 inch in size. Keeping the pieces uniform ensures they freeze evenly.
Making the Yogurt Mixture
-
Combine Yogurt and Sweetener: In a medium bowl, add the Greek yogurt. Stir in honey or maple syrup, adjusting the sweetness to your taste. If you like, toss in some vanilla extract to enhance the flavor, but it’s optional.
-
Fold in the Fruit: Gently mix in your diced strawberries, blueberries, and mango. Avoid over-stirring, as this can cause the fruit to break down and muddy the yogurt.
-
Add Optional Ingredients: If you’re including chocolate chips or nuts, sprinkle them in and fold gently. Remember that some may sink, but that’s perfectly okay.
Forming and Freezing the Bites
-
Portion the Mixture: Using a tablespoon, scoop out small mounds of the mixture onto your lined tray. If you have a small cookie scoop, it can make this process even easier.
-
Flatten the Mounds: Take the back of a spoon and gently press each mound down slightly. This step helps the bites freeze faster and makes them easier to eat.
-
Freeze: Place the tray in the freezer uncovered for about 2 to 3 hours, or until the bites are firm. If your freezer is on the warmer side, you may need to extend that time to 3 to 4 hours.
-
Store Properly: Once frozen, transfer the bites to a freezer bag or an airtight container. To prevent sticking, separate layers with parchment paper.
Storing and Enjoying Your Bites
For the best flavor and texture, enjoy your Frozen Greek Yogurt Bites within two months. Yogurt can absorb freezer odors over time, so press out as much air as possible to maintain freshness.
Texture Management

You don’t need to reheat these bites, but if you prefer a softer consistency, leave them at room temperature for 2 to 5 minutes before eating. Alternatively, letting them sit in the fridge for 10 to 15 minutes works too, for an easier chew without melting.
If you batch prepare, consider portioning them into small freezer bags containing 5 to 6 bites each. This strategy minimizes the need to open your main bag multiple times, reducing frost buildup and preserving texture.
Flavor Variations and Substitutions
The beauty of this basic recipe lies in its versatility. You can easily modify it based on what you have on hand:
- Vegan and Dairy-Free: Use coconut or almond “Greek-style” yogurt. Just remember to choose dairy-free chocolate chips if desired.
- Lower Sugar Version: Employ unsweetened yogurt and sweeten with a sugar-free syrup or granulated sweetener for a different approach. Just know that the texture can become icier without sugar.
- Nut-Free Option: Simply omit the nuts and increase the mini chocolate chips. Alternatively, consider using toasted coconut flakes for added crunch.
Creative Serving Suggestions
Serve these frozen bites straight from the freezer to experience a refreshing, candy-like snack. If you want a softer texture, let them sit for a few minutes before serving — this little wait alleviates the “too hard to bite” dilemma without making them melt away.
Pairing Ideas
- Breakfast: Enjoy a handful of bites alongside your morning coffee or a bowl of granola.
- With Overnight Oats: Especially refreshing in warmer months, these bites complement overnight oats wonderfully.
- Dessert for Guests: For a chic dessert presentation, stack the bites in a chilled bowl and drizzle with a bit of additional honey or maple syrup. Add fresh berries on the side for an easy yet impressive touch.
Tips for Perfect Results
Achieving that ideal texture and flavor is key when making Frozen Greek Yogurt Bites. Here are some tips to ensure your bites turn out perfectly every time:
-
Use Cold Yogurt: Keep the yogurt chilled before mixing. This ensures the fruit integrates smoothly without turning the yogurt runny.
-
Thoroughly Dry Fruit: Eliminate moisture by drying your washed berries well. This cuts down on icy pockets in the bites.
-
Taste Before Freezing: Sweetness can diminish when frozen, so aim for a slightly sweeter flavor profile before you put them in the freezer.
-
Maintain Consistent Sizes: Ensure each portion is about a tablespoon for uniform freezing. Varying sizes can lead to some bites being frozen harder than others.
-
Freeze on a Flat Surface: To avoid any sliding or merging of the bites, make sure your tray is level when freezing.
-
Avoid Rushing the Transfer: Make sure the bites are fully firm before placing them in storage; warm bits can lose shape and stick together.
Conclusion
Delicious and versatile, these Frozen Greek Yogurt Bites are an easy snack that the whole family will adore. With minimal preparation and lots of room for creativity, you’re sure to enjoy experimenting with flavors until you find your ultimate combination. So why not whip up a batch today? You’ll have a refreshing treat ready for whenever that sweet craving hits.